How to use the Select tool
The Select tool is the most advanced way of selecting features, including:
- selecting multiple features within a similar geographic area
- drawing an area of interest, then adding a buffer to create a wider area of interest
- selecting features that intersect or contain other features
- selecting features based on other selected features.
There are two main options when using the Select tool:
- Select by feature
- Select by geometry
Select by feature
Select features from one layer, and use their geometry to select features from one or more other layers.
For example, you may want to select all drainage features within a known property or group of properties.
Step 1: Click on the
Select tool (spatial query)

Step 2: Click the button next to
Select by feature using features from source.
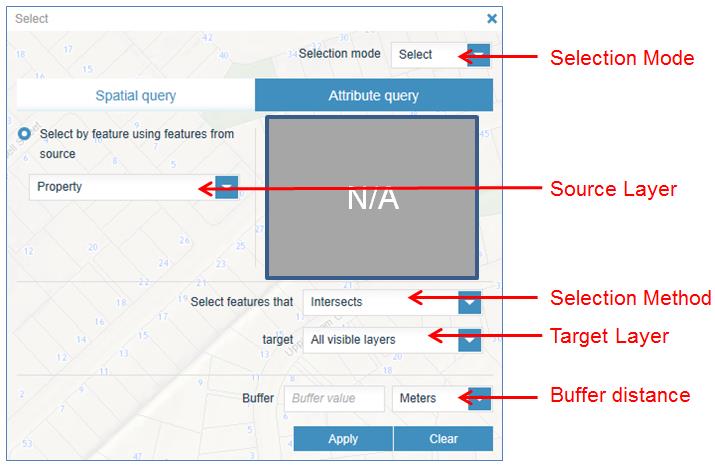
Step 3: Define your selection criteria.
| Selection mode |
Select: Select a new set of features. Any current selections will be cleared.
Add: Add to an existing selection. If there is no existing selection, a new selection will be created.
Reselect: Select a subset from the current selection. There must be a current selection.
Deselect: Remove features from the current selection set. A current selection set must exist. |
| Source layer | This is the layer that will have its geometry used as the extent which other features in the target layer will be selected. This includes all layers that are loaded into the current GeoMaps session and ticked on in the legend and within their visible scale extent (i.e. not grey in the legend). |
| Selection method |
Intersect: Any features within the target layers that overlap fully or partially the selected Source layer, will be returned in the selection results.
Contains: Any feature(s) within the target layers that is fully within the boundary of the selected source layer, will be returned in the selection results. Features that are only partially contained will not be included. |
| Target layer | This is the layer(s) that will have features selected, based on the criteria described in this table. Options include all layers that are loaded into the current Geomaps session and ticked on in the Legend and within their visible scale extent (i.e. not grey in the Legend). |
| Buffer distance | Distance from the boundary of the selected source features, where features from the target layer(s) will be selected (e.g. All drainage features within 10m of a selected property). Buffer distances are optional. |
Step 4: Locate the specific source layer features within the map. Do this by either:
- panning and zooming, and then clicking on the feature with the mouse
- using other tools such as the Search/Find tool (e.g. If you are interested in finding all of the park assets within Coyle Park in Pt Chevalier).
After you have successfully selected the source feature, you will notice that it is highlighted in the display and the results are presented in the Results panel.
Step 5: Click
Apply.
After clicking the Apply button, you may not notice any difference in the display, especially if the source layer is Property. This is because the default results of only one layer at a time can be presented in the Results panel and in the map display, and by default this includes the Property layer as the one to display.
All of the selected features from the target layers will be available in the Results panel layer list.
Select by geometry
This involves creating a sketch using draw tools, and using the coordinates or boundaries of the sketch as the extent which to select features from one or more layers.
Step 1: Click on the
Select tool (spatial query)
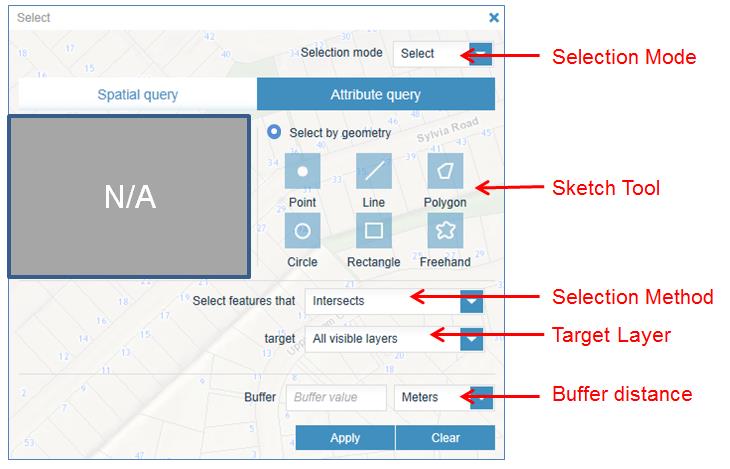
Step 2: Click the button next to the Select by geometry.
Step 3: Define your selection criteria.
Selection mode
|
Select: Select a new set of features. Any current selections will be cleared
Add: Add to an existing selection. If there is no existing selection, a new selection will be created
Reselect: Select a subset from the current selection. There must be a current selection.
Deselect: Remove features from the current selection set. A current selection set must exist
|
Sketch tool
|
The sketch tool selected will be the type of sketch used for selecting features.
|
Selection method
|
Intersect: Any features within the target layers that fully or partially overlaps the selected source layer will be returned in the selection results.
Contains: Any features within the target layers that is fully within the boundary of the selected Source layer, will be returned in the selection results. Features that are only partially contained will NOT be included.
|
Target layer
|
This is the layer(s) that will have features selected, based on the criteria described in this table.
Options include all layers that are loaded into the current GeoMaps session AND ticked on in the legend AND within their visible scale extent (i.e. not grey in the legend).
|
Buffer distance
|
Distance from the boundary of the selected source features, where features from the target layer(s) will be selected (e.g. All drainage features within 10m of a selected property). Buffer distances are optional.
|
Step 4: Locate the specific area of interest in the map by:
- panning and zooming, and then clicking on the feature with the mouse
- using other tools such as the Search/Find tool (e.g. If you are interested in finding all of the park assets within Coyle Park in Pt Chevalier, search for the park using the Search/Find tool).
Step 5: After you have found the area you are interested in, create a sketch over the area/point/line to define the area.
Click Apply.
